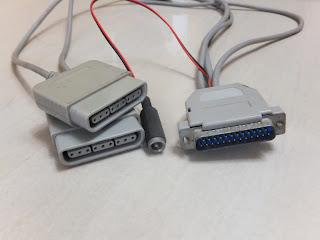
My friends and I are big fans of KOF. We all know the latency between PC and USB converter of PS joysticks is too long to enjoy our fight. However, the PS joysticks to PC via parallel port is a nice choice for low latency. (It you want to know how the converter works, please refer another Chinese site : http://stevie.myweb.hinet.net/adaptor2.htm )
PlayStation joysticks converter via Parallel Port.
Although it's nice but my computer with parallel port is broken. Why don't we play NeoGeo or MAME on Raspberry Pi? Thus, there is a plan in my mind to turn Raspberry Pi as a console game platform to play many kind of emulators, and RetroPie is a such great project supports SNES, NES, GBA. GB, SEGA, and MAME. In this part, I only focus on how to modify the joysticks and won't mention how to setup an emulator.
I should have a set of very handful joysticks for my game platform. The legacy PlayStation joysticks via GPIO is the best choice because it got the benefits of 12 buttons and 4-axis analog control, and the most important one is with very lower latency via GPIO than USB. If you are a fighting gamer (KOF, Street Fighter) as us, you will know why the latency is such important.
So, let's start to modify the converter for RaspberryPi.
gamecon_gpio_rpi is the driver for NES, SNES, GameCube, and PS Joystick via GPIO, and it's included in RetroPie. In this instruction, you will see how to connect a PS joys to Raspberry Pi. If you need to know the pin descriptions of PS joy, this site gives you how PS joysticks work. The connection method is some different between rev 1.0 and rev 2.0 of RPi. My RPi is rev 2.0, so I summarized the pin table.
I start to make a simple connector for the P1 of RPi and DB25-Male. Here are some materials I prepared and the connector that I finished:
After a little work, connect with PS joysticks, converters, and RPi together. Start to test it!!!!
If the kernel module of gamecon_gpio_rpi is built correctly, you can install the module by the command:
pi@raspberrypi ~ $ sudo modprobe gamecon_gpio_rpi map=0,0,0,0,7,7 psx_delay=14
The parameter "map=0,0,0,0,7,7" is indicated using Pad5&6 as both PlayStation joysticks.
The parameter "psx_delay=14" configures the access delay for psx pads to 14ms. The default is 10ms, but it doesn't work correctly. 14ms is more save for me.
After modprobe, there should be two joystick devices in /dev/input/jsX. (X indicated 0 & 1.) Then use the command to test:
pi@raspberrypi ~ $ jstest /dev/input/js0
Driver version is 2.1.0.
Joystick (PSX controller) has 6 axes (X, Y, Rx, Ry, Hat0X, Hat0Y)
and 12 buttons (BtnX, BtnY, BtnTL, BtnTR, BtnTR2, BtnSelect, BtnStart, BtnMode, BtnThumbL, BtnThumbR, ?, ?).
Testing ... (interrupt to exit)
Axes: 0:-32767 1:-32767 2:-32767 3:-32767 4:-32767 5:-32767 Buttons: 0:off 1:off 2:off 3:off 4:off 5:off 6:off 7:off 8:off 9:off 10:off 11:off
If all buttons and axis work well, congratulation that the joysticks setup correctly on RPi!!
There will be another article soon to share how to setup the emulators on RPi.


